It is surprisingly difficult to find clear views of the Las Vegas Strip. Most good vantage points are covered with glass, which creates bad, un-editable reflections in your photographs. Clear and open areas with good views are few and far between, so when I found this photo location I knew it was something special.
Getting the perfect location for a photograph is difficult no matter where you are in the world. But in chaos like Las Vegas, getting the shot requires doing some homework. If you don’t live near there, you won’t know where to look for the ideal views. And relying on Google is also difficult since only the most popular locations are talked about online. But the popular locations can be so packed with people, it becomes impossible to even set up a tripod.
Using Instagram to find locations has lead me to some of my favorite photo spots, not just in Las Vegas, but around the world. But when photographing inside cities, the secret is to talk to the people in hotels, like the concierge. In most cases, these workers love helping people out every chance they get. Just don’t forget to leave them a nice tip. Here’s how to get the best photos in Las Vegas:
- Research and plan ahead: look on Google Images or Instagram for the best locations, and then figure out how to get there.
- Be prepared: know when the regular light shows happen, and what settings you need to use to capture them at night
- Take photos at blue hour so there is still some color in the sky to contrast against the warm city lights
- Talk to hotel staff: locals know the best hidden locations to go to, and the staff will help you get to the right places at the right time
If you follow these rules, you’ll get incredible photos every time you head out. It’s most important to find locations that are not covered in glass to avoid those reflections and glares that ruin your images. Here are a couple examples of the photos I took on my recent trip to Las Vegas. The second photo is my favorite, and one of the best photo locations in all of Las Vegas!

The everyday Las Vegas photo locations
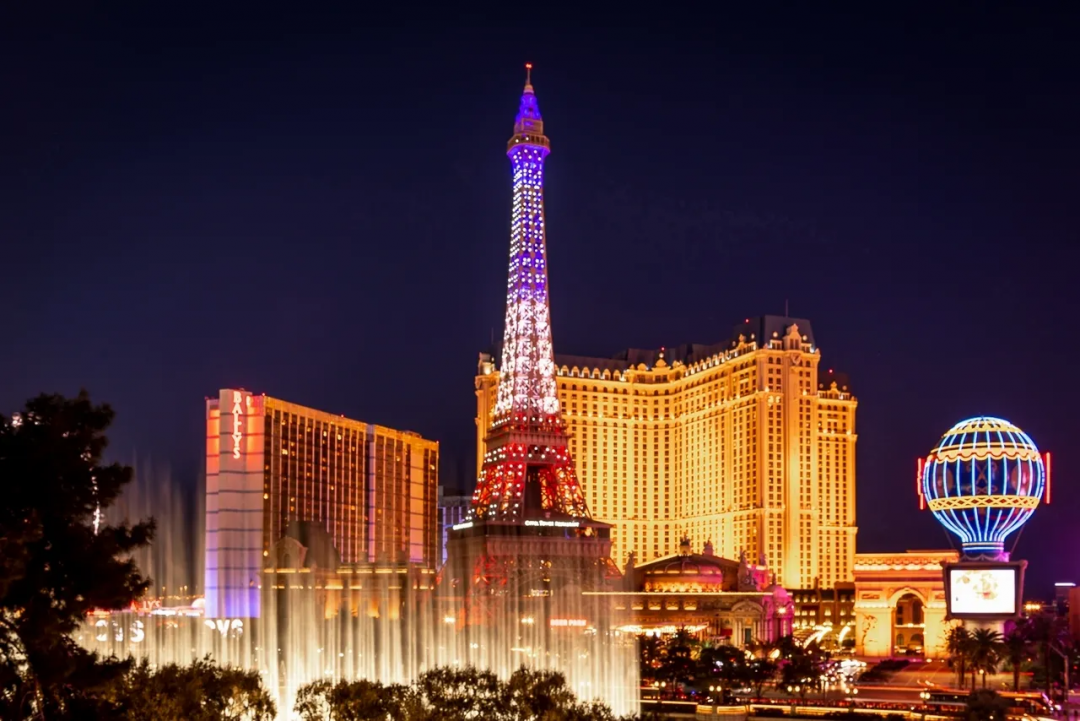
The easiest photo location where you can see the Eiffel Tower and the Bellagio fountains is on the top level of the Bellagio parking garage. You can drive a car right to the top and take your time while you shoot across the fountains in the direction of the tower and Planet Hollywood, which you can see above.
This view is a nice, clean shot of the best part of the Las Vegas Strip — the only downside of the Bellagio parking garage location is that trees have grown up so you cannot see the water of the lagoon.
However, I had to go back to shoot here a second time. When I imported my photos into Lightroom after the first shoot I saw to my dismay that my photos were not sharp. I initially thought I had made an error by not refocusing after changing the zoom on my lens, so I went back to the same location two nights later and took the same photo. When I reviewed the photos in the field I saw to my surprise that they were also just slightly blurry.
At first, I panicked, because the only logical explanation was that my lens was not focusing correctly. It was then that I realized that the very solid-looking concrete wall that my tripod was sitting on was not actually rock solid. When I rested my hand on the wall I could feel a very slight but constant vibration, and when shooting long exposures any vibration will result in a soft photo.
Always look for sturdy areas when setting up a tripod
The workaround for me was to place my tripod onto the more-solid ground, and extend the legs to their maximum height. My photos were tack sharp from that point on. I felt redeemed that I hadn’t made a focus mistake after all.
After taking these shots I wanted an even better photo location of the Vegas Strip, so my wife and I rented a room at the Cosmopolitan Hotel, located beside the Bellagio. This place is not cheap…just saying.
We wanted to ensure that we were high enough so the Bellagio bell tower would not block the view, but not too high so the photo would look like a drone shot. For photos like this one, the lower, the better.

How did I find the perfect view of Las Vegas?
When you’re visiting a new city, there are a few people who will really go out of their way to help you with what you need. If you’re friendly to the front-end staff, they’ll be extremely helpful when you ask them about the best views in town. Luckily, the hotel we were staying at has some of those incredible views of the strip — but those are usually the rooms that cost extra, or are difficult to book.
So we worked with the concierge at the hotel who took us to numerous rooms on various floors until finally we found what seemed like the perfect location. If you want to know exactly what room it was, then you have to join my mastermind and I will tell you.
The Bellagio water fountain show occurs every half hour after sunset, and every 15 minutes later at night. So at the first show after sunset, we were in position with the camera on my favorite tripod on the outdoor deck of our room when I shot this multi-image panorama. It was so awesome not to have to worry about shooting through glass, or security asking us to leave, and being able to take our time.
I am super happy with the composition, and personally think it’s my best photo on the strip. It has balance and symmetry — equal visual weight on the left and the right make this a very balanced subject. The main subject is brightly lit fountains, which creates a curved leading line. And it has that awesome Eiffel Tower on the right 1/3 line. You’ll be hard-pressed to find a better photo location in Vegas.
What’s the best time to take photos in Las Vegas?
One of the most overlooked factors of taking photos in Las Vegas is finding the right time of day. Most of the photos that you see of Las Vegas happen at night, so it can be tempting to think that you’ll be able to go take photos after mid night, when much of the action is happening around the city.
And that’s true to a degree. But the best photos happen just after sunset at a time called Blue Hour. Blue hour is the time 30 minutes after the sunset. This is when the sun is just below the horizon, but is still lighting up the sky, reflecting back a dark blue color.
This is the perfect time for most cityscape photography, because the blue sky perfectly contrasts with the warm yellow lights of the city. When you’re taking photos at this time, there is a certain magic in the images that you won’t find later in the evening, when the sky is pure black. As well, if you’re there at sunset, the city lights won’t be as bright in the photos, and the colors of the sky will match the colors of the city, making for a nice composition, but not enough contrast to really make it stand out.
So to get the photo at blue hour, you will have to plan your photos to a tee. Make sure you know exactly where to stand, and be there a half hour early to set up and take that photo when it happens. Because that magic hour light may only be there for 5 minutes before its gone!
How to get started finding your own incredible photos like this?
My four-step system will help you learn how to research and plan your photo locations,
- Know how to get to the right place at exactly the right time for the best light.
- Knowing how to find fantastic compositions wherever you are. Even if you are in your own backyard taking pictures of flowers.
- Know easy-to-use camera settings so your photos will be tack sharp and correctly exposed.
- Knowing how to QUICKLY edit your photos to create drama. Learn to highlight the good parts and downplay the bad parts. This way the viewer sees only what you want them to see.
- Know how to print your photos in the best and easiest possible way.
Check out this photo of one of my graduates who just made a print for the very first time:

This is Jeff Dodds. He just printed his photo and this is what he wrote about it inside our Facebook mastermind group. An exclusive forum where students and I exchange tips and ideas as part of the Photography Transformation Masterclass.
“Here is my first ever finished canvas print. I am overwhelmed with joy seeing this thing in real life. Tim said it best. Taking your work out of the digital world and printing it is powerful. You truly get to have a personal connection between you and your art.”
It makes me super happy to see students printing their own art and hanging it on their wall at home. It feels so good to be proud of a printed photo that you created out of thin air!
Start learning today
So if you want to take your photography to the next level, then now is the time. I have a free online web class that will teach you the 3 secrets I use to take beautiful photos. If you want to start taking photos you are incredibly proud of, sign up for the free web class today.


