Watch the video above to see how I shot these cityscape photos from the roof of the tallest building in Paris.
Everyone loves beautiful cityscape photos, but do you know how to take them so they look gorgeous?
When I was starting out in photography I thought the secret was to have a good camera and a tripod, but that is not it. Yes, you need a tripod to get the perfect shot with the perfect light, but the tripod is not the secret to getting a stunning cityscape photo.
The secret is easy to remember because it is all about light. You need to be in position and ready to go for the moment the perfect light happens. This is usually around 15 minutes after the sunsets. At this time, there is a very short window of opportunity when balancing occurs between the amount of light still in the sky and the amount of light on the ground. This is the time when the magic happens in photography.

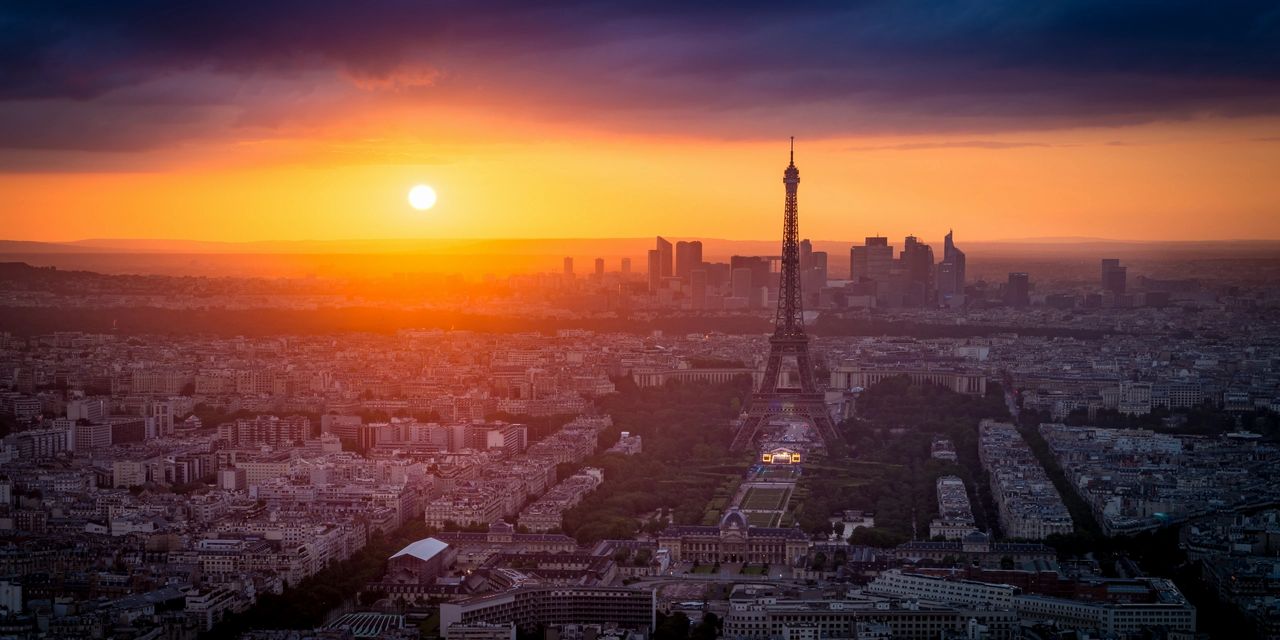
Look at the photo above of a Paris cityscape. This is the perfect light. This window of opportunity is less than ten minutes, and sometimes just five minutes. I call this time “The Golden Minute” to remind me just how quickly the moment is gone. This is the time when the light in the sky has dimmed down, and the artificial lights of the city are visible. There is a perfect balancing point that you need to catch so you can get your perfect photo. Notice how you can still see the details on the buildings? This is what you want. If you wait any longer then the details on the buildings are gone. See the photo below:

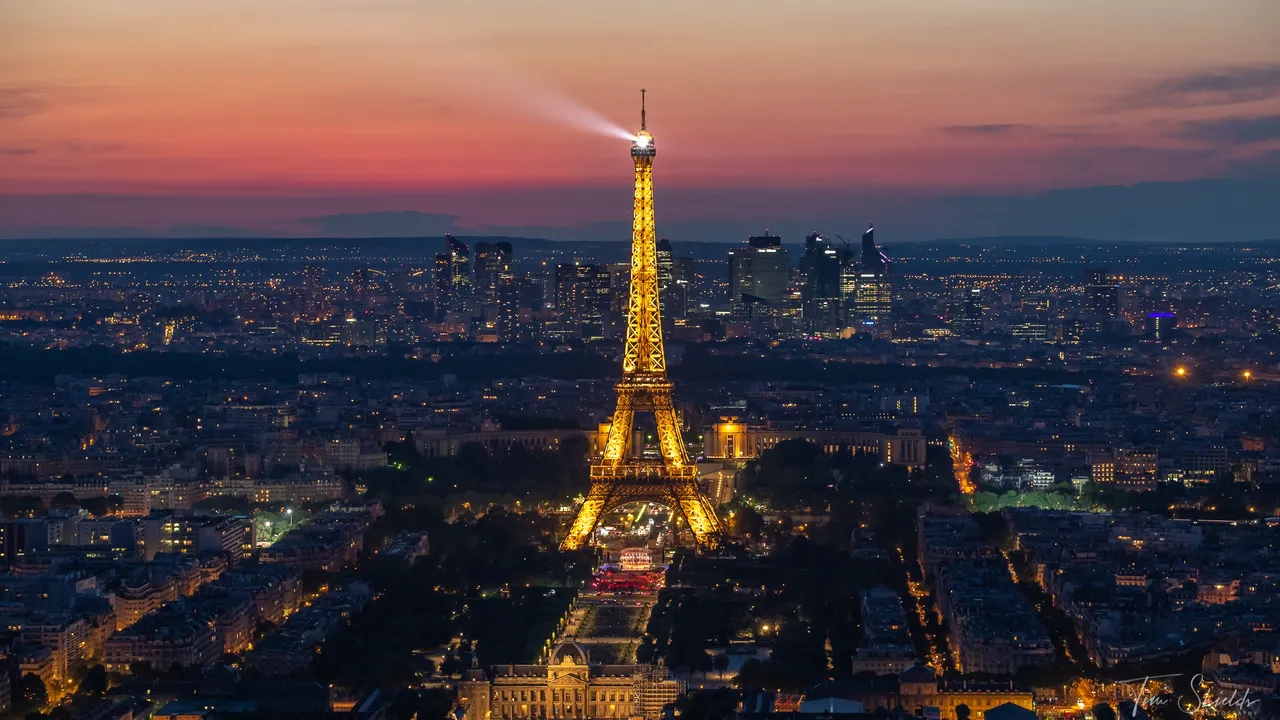
This second photo of Paris and the Eiffel Tower illustrates what the city looks like when you wait longer to take your photos. Notice how the black tones are so prominent on the buildings? There is too much shadow in the photo and it does not look as nice as the first photo. This is called clipping the blacks, and the camera’s histogram would be bunched up on the left side. The photo still looks interesting and the lights stand out more than in the first photo, but I prefer the photo where the details in the shadows can still be seen.
The timing of these photos is everything
The perfect light comes just a half hour after sunset, right before blue hour when the the city and sky are evenly lit up. So here are my top tips for capturing amazing cityscape photos.

Photos, before the sun has set, are amazing as long as you are not blowing out the highlights. This photo was bracketed and converted into an HDR.
1. Get in position early.
If you are in a tourist spot then the viewpoint is going to be crowded. Get to the photo location well before sunset so you will have an uninterrupted view. If you arrive late, then the selfie-stickers are going to be standing in front of you and you will lose out on your awesome cityscape skyline photo.
Get there early and set up your tripod in the right position. That way the tourists will know that this is your spot, and you will be able to get the best shot. That also means when the right moment comes, you won’t be able to change your position. So be sure to scout out as many similar locations as possible before the time comes.
2. Use Balance and Symmetry
Think about balance and symmetry from side to side. Place objects of equal visual weight on either side of the frame. Put the horizon line on the top third of the photo (the rule of thirds). Use your cell phone to help you choose the best composition.
Notice how the road on the left of the Paris cityscape photo (the first photo in this article) is balanced out with the road and building on the right? Notice how the Eiffel Tower is in the middle? This is balance and symmetry at its best and it is why this composition from the tallest building in Paris works so well.
3. Know the right camera settings
The worst thing is to come home and find your images weren’t exposed correctly. Sometimes the automatic settings on your camera will work perfectly, but more often than not it’ll be wrong. The best thing you can do is to learn how to adjust your camera manually, or to use aperture priority and exposure compensation to get you image perfectly exposed.
Sometimes it can be difficult to see if an image is exposed properly by looking at the image on the back of the camera. Since those screens are not high resolution, they don’t typically show you everything you can see on your computer screen. The best way to tell if the exposure is correct is to use the histogram on the back of the camera. That will tell you if the image is over or underexposed. Learn more about how to use the histogram in this article.

5. Take test shots!
Lots of them. Pay close attention to your composition. Don’t crowd the edges of the frame with important elements of your composition. While you have the time, send the photos to your phone if you can. Your phone has a higher resolution screen and can edit the photos using free apps like Snapseed. Once you start editing, you’ll see exactly how to adjust your composition to make it perfect before the golden minute comes!
6. Choose a focus point about 1/3 through your frame.
If you have a foreground in your photo, this is super important so that your foreground will also be sharp. Make sure to use a small aperture like F/11, or F/16 to get everything in focus when focusing on the lower third of your frame.
If you’re using a telephoto lens, you may have to focus stack your images to get it tack sharp throughout.

8. As soon as the city lights turn on, IT IS GAME TIME!
This is when the magic happens. Keep taking photos so you will catch that short window of time when there is still ambient light in the sky, but city dwellers have all started to turn their lights on. This really, really is when the magic happens.
9. Protect your tripod
]don’t let it get bumped by the selfie-stickers. Use your camera’s timer, set to two seconds, so you are not causing a vibration when you take your photo. Even better, buy a wired shutter release so you don’t have to touch the camera at all.

10. Know when to stop.
Once the cityscape has become dark or the sky is dark, it is time to tear down and go enjoy your night. The pressure of getting a great photo is now off, and you need to re-join the social aspect of the night with your travel companions.
Above all else, make sure you find that narrow window of opportunity when the light balances out between the sky, the city lights, and the ambient light on the ground. It is the golden minute, and it is your best opportunity…and it will end just as fast as it begins.
Don’t miss out!
Do you want to learn more about landscape and cityscape photography?
 I have put my entire training bundle on sale at the deepest discount ever. The cornerstone of this bundle pack is my six-hour course called the Landscape Photography Transformation Masterclass where we take a deep dive into:
1. Finding the best locations for landscape photography. What apps to use, how to research online and plan an amazing photo trip.
2. How to find the perfect composition, what to look for, and how to frame up your image to create a stunning photo.
3. How to set up the perfect camera settings that are easy to remember, and will result in a sharp and perfectly exposed image.
4. Creating drama in your photos through post-processing the easy way.
5. Printing your photos and creating your own fine art that is ready for your wall at home.
6. Promoting your photography through your own website and social media.
Take the free online photography webclass now and learn the secrets to amazing photos.
Click here to let me help you take your photography to the next level.


